Do you want to express your contents on your own website? Then follow my step guides to start with.
You can publish your contents on website on the internet with the help of web hosting services. To put it another way, hosting companies will rent a portion of their web server to store the files and data on your website.
Your web hosting company will be responsible for distributing your website’s content to visitors who enter in the domain name of your website.
All users have access to beginner-friendly tools provided by web hosting, so they can get started right away.
Choosing Web Hosting Services:
Before choosing a hosting business, it is critical to conduct extensive research. You should think about a few things, such as:
Flexibility- To manage your web hosting account, every web host offers a control panel. Check to see if the dashboard is simple to use and has a lot of features.
Speed- Choose a web hosting company that guarantees fast loading times and a high up time guarantee to ensure that your website is available at all times.
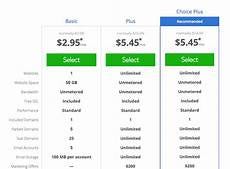
Pricing- Consider the add-ons and renewal costs that would match your budget in the long run before acquiring a hosting plan.
Customer service- When you run into a technical problem, choose a hosting business that has a dependable support crew that can help you right away.
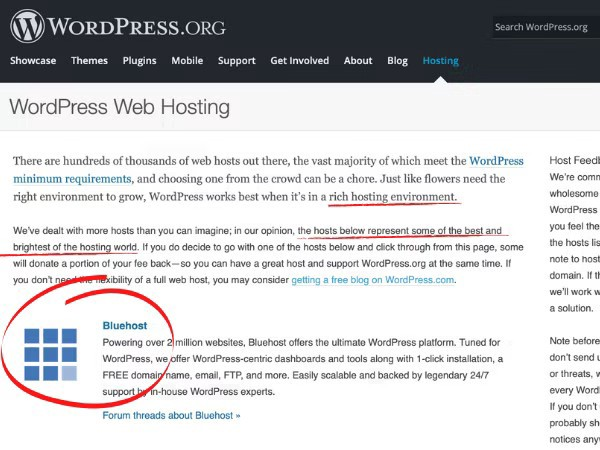
Bluehost is not just one of the most affordable hosting platforms (ideal for new blogs that have yet to generate revenue), but it’s also a one-stop shop! Any of the Bluehost plans will allow you to register a domain name for free. This streamlines the procedure and moves you closer to creating your blog. More than 2 million websites are using Bluehost making it one of the most reputed web hosting service.
Recommended on Wordpress
Bluehost is one of the web hosting services which is recommended by Wordpress
Simply follow the steps in this simple Bluehosttutorial to get your own blog up and running.
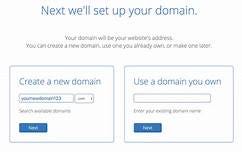
After that, you’ll need to decide on a domain name. If you want your website to have a catchy and original name, but you also don’t want it to be too long then choosing a suitable domain name is crucial. Make certain that your domain name is simple to pronounce and type. Try to include a keyword in your name if at all possible.
Step 4: Create Account
Fill in your details
Step 5: Payment
Enter your payment information. Be sure to keep a record of the receipt.
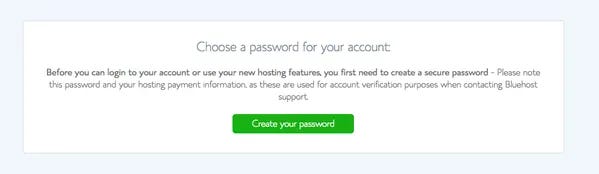
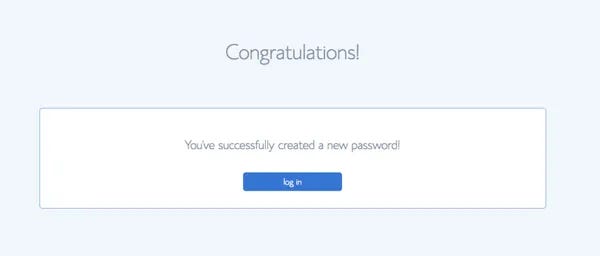
Step 6 : Create your Password
Use a password that is safe and difficult to guess. You’ll be putting a lot of time and work into your blog, so make sure it’s secure.
Step 7 : Account Creation completed
Hurray!! you are done with creating account on Bluehost. Now you can proceed to login.
Connecting To WordPress
Now that you’ve finished the Bluehost lesson, let’s get started on integrating WordPress. Because Bluehost installs WordPress for you, this step is actually very straightforward. Although it may appear repetitive, .I added this step since people have asked how to connect Bluehost and Wordpress. It only takes a few minutes to set up
Step 8 :Log in to your Bluehost account
Once your payment is done you will receive a welcome messsage from Bluehost.
To get started with Wordpress please click on the bright green tab "Create your Password". You have to create a password here, so move on to type a secured password.
And thats it!! Your Wordpress has been successfully installed in the background.
Now, just open your Bluehost account dashboard. Here you can login to your wordpress, just click on the blue tab "Log In to Wordpress" to access your Wordpress blog.
Hit Enter and you will be taken to the login screen of your WordPress blog:
Enter you Log In details to get started.If you are not sure about login details, then just check your mail you have received a Welcome main from Bluehost which contains such log in details.
Wordpress Dashboard:
Once you have logged in you will be takes to your Wordpress dashboard or also called "admin section".
Here you can write your beautiful contents.
Now, lets have a look on features that is visible on left hand side in your Wordpress dashboard which you will be using while creating your contents.
Posts :
Write, edit, view, and manage your blog articles.
Media:
Upload and manage photos, videos to your blog.
Page:
Create and customize your individual pages, like Contact or About Me page.
Comments :
Manage all comments from your readers to create a lively discussion on your blog!
Appearance :
Find, install, and configure new WordPress themes to customize the design of your Bluehost WordPress blog.
Plugins :
This helps to add add new features to your blog, such as contact forms, nifty SEO tools, security and backup tools, and much more.
So we are now at the end of this tutorial, thanks for being with me, hope I have provide all required information.


Comments
Post a Comment